So I have some Tri-X (Arista Premium 400) loaded in a patterson tank I presoaked in water, then soaked in a pigment that has a certain amount of IR absorption.
Now the film is drying in the tank and will be re-loaded into a reloadable 35mm canister.
Hopefully there'll be some pigment adjacent to the silver halide, and hopefully the pigment will be able to transfer energy to it.
I'll be shooting it with an R72 filter, focussed visually on a ruler for test shots, looking for a focus shift on the ruler.
Friday, December 24, 2010
Thursday, November 18, 2010
C-41 Infrared Test #1
C-41 Infrared Test #1
I figured just like with digital cameras, in a consumer product you can't remove all susceptibility outside the visible spectrum, just have several stops of difference in sensitivity.
R72 Filter used, +14.5 stops of 'filter compensation' to get this effect, or EI 0.017 from a ISO 400 film (I should mention this included 2 stops of reciprocity correction, but its just guess work at this point).
Exposure was f/2.8, 15 seconds, correct unfiltered exposure was f/11, 1/400th.
I was considered lowering the pH level of the C-41 developer to effectively underdevelop the reds, but the reds dont seem that dense as I suspect they would be, they seem quite godo, but the green and blue channels have a thin density range.
Needs more exposure, with a green and blue filter, would probably help a bit.
Defniately seems to be an IR effect their to my eyes.
Film was ISO 400 35mm cheap unknown brand film, unknown age.
Scanned with levels set on each colour channel to not have any clipping at all, then auto-levelled to provide a 'balanced' image (regardless of false colour) to see the effect.
Test #2 will include the colour filters and increased exposure.
A high contrast film may be much better for this, less expansion of green and blue would be needed, hence less grain contrast, and less shitty scanner noise, perhaps Velvia etc.

Thursday, October 28, 2010
CuSO4 Bleach vs Flexicolor Bleach Test #1
Okay again... poor choice of shitty unbranded unknown 400 ISO old expired C-41 film leads to crappy results
Top is CuSO4, bottom is Flexicolor.
2min 45 sec in Flexicolor C-41 (38c), EI 50 (was intending +3 EI and N-2 dev.. not sure that worked out given the density)
This test though does prove Copper Sulphate Bleach WORKS, and the colour seems fine.
The density may seem similar overall, but each individual channel on the CuSO4 bleach is broader, though its a different image of course.
Anyway, density on both is so close to the end of the scanner range, that is normally clipped by 'max' levels, becomes hard to correct colour.
In any case, film is fogged, too much exposure also I guess for 2min 45sec.
But if the CuSO4 didn't work as a bleach, then there would also be a silver neg image on the film (which you could see by eye if there was), AND the density would be even greater, when max density is about the same as Flexicolor, differences due to exposure.
Other indications CuSO4 works: Back of film turns green/blue in bleach like its supposed, and you can see the image on the back of the film before fixing like it's supposed to as well.
Test needs to be re-done with fresh film, normal exposure and development.
But a big tick so far for CuSO4.
Bleach recipe used (I only mixed up 100mL in a beaker for a single frame):
100g/litre Copper Sulphate
100g/litre NaCl (I used table salt, whic his sea salt + anti caking agent since thats all I had - is fine).
You're supposed to filter or decant it as well, but I didn't.
According to literature I have, the shelf life is supposed to be 12 months or more (copper sulphate and salt aint going nowhere!), and the capacity is supposed to be 5 x 36exp 35mm rolls per litre (I'm sure it'd be more like other bleaches).
Bleaching time is alleged to be 6-7 min for film (C-41 and E-6) at 24 degrees celsius (I walked away and left both for 17 minutes as I forgot about them).
For paper (RA-4) its alleged 3-4 min at 24 celsius, and allegedly can do 30 8x10 prints a litre.
C-41 1+9 Stand Test #1
Okay so basic test was, Flexicolor C-41, diluted in to 1+9, and about ~1.2mg/litre of potassium iodide added. A while back Daire Quinlan tried a C-41 1+9 stand development, I decided to expand the idea in the search for various ways for good quality processing of C-41 at 20 degrees celsius (harder than it sounds).
Processed at ~20 degrees celsius, for an hour, pure stand iirc.
I was going to adjust pH to put it around 10.2 or so, but then I thought stand development may have a compensating effect, which means the RGB densities shouldn't be too far off each other, and potassium iodide also is supposed to promote even layer development between layers.
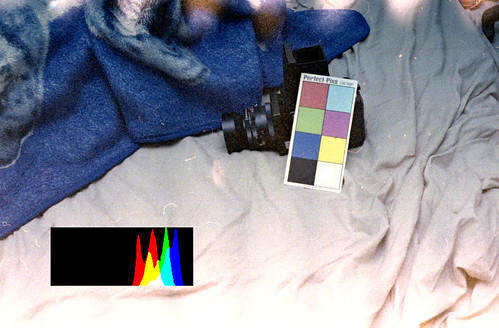
I've included the original RGB histograms on top of the image so you can see the rough density for each channel, remember highlights to right on a histogram on negative films means denser, and to the left is thin.
The results are dense with a thin range, (dMax close to dMin for each channel), however, it's actually better than normal C-41 processing at 20 degrees celsius in this regard. Also some of the density may be attributed to the uneven developed areas which were denser as you can see (blown out or very bright as I corrected to the main part of the image).
But, with agitation it should prevent uneven development, but that density shall still... so the solution is shorter time... or more potassium iodide, I think I will try more potassium iodide.
Another word on the density... it was very old no-name (unknown) brand 400 ISO film I got for 50 cents a roll at a fair, also overexposed, so there is base fog to it, so I feel dMin would be lower (good) with fresh film
Also grain is actually normal ocompared to regular proces C-41 with this film, where as Daire Quinlan experienced increased (excessive?) grain, may be a result of the potassium iodide I added, but it should be confirmed with fresh and good fine grained film.
Test #2 will increase the potassium iodide and increased agitation (probably at 20 minute and 40 minute marks), I am not sure how much to increase it by, perhaps 4x.
The goals are to get even development, a little less density, and much lower dMin.
Processed at ~20 degrees celsius, for an hour, pure stand iirc.
I was going to adjust pH to put it around 10.2 or so, but then I thought stand development may have a compensating effect, which means the RGB densities shouldn't be too far off each other, and potassium iodide also is supposed to promote even layer development between layers.
I've included the original RGB histograms on top of the image so you can see the rough density for each channel, remember highlights to right on a histogram on negative films means denser, and to the left is thin.
The results are dense with a thin range, (dMax close to dMin for each channel), however, it's actually better than normal C-41 processing at 20 degrees celsius in this regard. Also some of the density may be attributed to the uneven developed areas which were denser as you can see (blown out or very bright as I corrected to the main part of the image).
But, with agitation it should prevent uneven development, but that density shall still... so the solution is shorter time... or more potassium iodide, I think I will try more potassium iodide.
Another word on the density... it was very old no-name (unknown) brand 400 ISO film I got for 50 cents a roll at a fair, also overexposed, so there is base fog to it, so I feel dMin would be lower (good) with fresh film
Also grain is actually normal ocompared to regular proces C-41 with this film, where as Daire Quinlan experienced increased (excessive?) grain, may be a result of the potassium iodide I added, but it should be confirmed with fresh and good fine grained film.
Test #2 will increase the potassium iodide and increased agitation (probably at 20 minute and 40 minute marks), I am not sure how much to increase it by, perhaps 4x.
The goals are to get even development, a little less density, and much lower dMin.
Friday, October 22, 2010
Trying Rodinal Reversal / "E-6" Again.
Attempting Rodinal Reversals for colour film again... trying with C-41 first off for cheap testing to start with.
Specifically right now I'm half-way through a 1+100, 1 hour stand on some Supra 400 I had shot (probably random stuff) a while back to see how it turns out.
This time I have made additions of Potassium Iodide and Ilford Rapid Fixer (Ammonium Thiosulphate), I do have some sodium thiocyanate, which is typical in E-6 first developers, but I hope this is enough, or I'll try again with an increased amount.
Update: Nothing on that roll, will have to shoot another roll tomorrow for testng.
Update: Some advice from Photo Engineer of APUG - "Well, Ammonium Thiosulfate is not good. The Ammonium ion is also a fixing agent and fogging agent to some extent and should not be used in developers as a general rule. You should only use Sodium Thiosulfate in this instance or Sodium Thiocyanate. The Thiocyanate is often used but you will again have to work out the amount needed."
Sunday, October 10, 2010
Things to try
Been in Melb for 6 weeks now...
Got a few things to try... pull-processing C-41 film, which I've already done in Rodinal and re-developed to colour before.. though that was 14 stop pull... good for daytime long exposure with no filters.
Got some old ISO 400 film that seems a bit crap and foggy at 400... though I did accidentally overdevelop it. Anyway, expose it at EI 50 and develop for 2 min 45 sec is the plan to see how it comes out.
Some bigger pulls with shorter times or C-41 with a 1+1 or 1+2 dilution and EI 12 and slower just to have a play.
Need to find some HCl from a pool shop to finish my concentrated 2 part colour negative developer.
Also got a roll of Rollei Pan 25 to test out.. not sure what to actually use it on though is the problem.
I want to try some Ektar 100 in 35mm lab-developed, and developed 'normally' (EI 100) in my concentrated developer (1+1+50), and pulled to EI 25 (1+1+100), with 8000 dpi Flextight 848 scans - just to ascertain differences.
The unbranded 400 ISO C-41 film shot @ EI 400, developed 3 min 45 sec accidentally and not agitated much (2 stop accidental push, was very dense and crappy), developed in Kodak Flexicolor at home, colour corrected (since it's C-41, posting orange negatives would be kinda odd).


Thursday, September 16, 2010
New Portra 400 film

New Portra 400 announced - http://www.kodak.com/global/en/professional/products/films/portra/400main.jhtml
Images - http://canlasphotography.blogspot.com/2010/08/film-is-not-dead-san-diego-v-20-day-3.html
http://www.facebook.com/album.php?aid=213771&id=87452556121
Replaces both 400NC and 400VC, it has the contrast of NC, it uses improvements from the Vision ECN-2 motion picture film line with saturation between NC and VC, finer grain and greater resolution (sharper) apparently. It wil lbe avaiable in 35mm 36exp, 120 roll, 220 roll and 4x5 sheet film (no 8x10).
400NC and 400VC are expected to be available until December 2010.
Given it's finer and sharper characteristics and low contrast, I look forward to treating it like Tri-X (yes yes, completely different film, but still..), I would like to try Rodinal 1+100, 2 hour semi-stand first dev (EI 6400 for Tri-X), and colour rehal dev, and also a custom colour developer for pushing, just to see.
My thoughts is that this is a 400NC replacement with improvements, 400VC also appears more vivid than 400NC because of its greater contrast, the new 400 retains 400NC's contrast with greater saturation, but shouldn't appear so vivid.
If you cant do without 400VC, buy up, and an extra freezer to stick it in.

Thursday, August 26, 2010
Colour Negative Developer Update
Okay so I think I've cracked the highly concenrated and dilutable colour negative developer.
I'm getting the or rather a correct pH (~10.22 @ 17.4 celsius test temperature in initial tests) of a test solution of what is a 1+100 dilution, or rather a 1+1+100 dilution since the developer will come in 2 parts.
I'm moving to Melbourne on Wednesday afternoon next week so I hope to do some test runs of the developer that week.
Friday, August 6, 2010
"Meter for the shadows"
Backlighting can be very pretty, as long as you bring extra light to light the front or side of the subject etc.
Film users often to say meter for the shadows and expose for that, you can develop normally or develop for highlights after that depending on the case.
Well I'm not doing a little roundup test, with Shanghai GP3 and Kodak Ektacolor Pro 160 to start with.
Of backlit objects, normal incident reading/correct exposure in the key light (direct sun), and then also an incident reading of the shade of the backlit object, both of these exposures also made on a 30D for digital reference.
First I will see how the GP3 holds up in these situations in a Rodinal stand for 1 hour, if the highlights are too dense, then dilution will be increased or time decreased.
Then I will see how the Ektacolor Pro 160 holds up in regular C-41 development, then split bath development, and then also finally stand developing in Rodinal for an hour (and rehal developed back to a colour negative).
Monday, August 2, 2010
Looking for work
I'm currently looking for work, so I can fund more film and chemicals, and more cameras. Well, and of course rent and food.... but that's lower priority ;)
I had an offer from Owen from David Hawk English School, who posted me a contract and can sponsor me for a VISA for teaching English in Zhongshan, about 130km west of Shenzhen iirc.
I'm unsure whats best for me to do.
Whether I should take that, hold out for other offers, or try to find an offer from Japan, or simply pack up all my crap into storage and stay at a hostel in Sydney while looking for anything (such as night fill), though I'd be giving up shooting film mostly, and I'd probably need to get some kind of laptop which is more expense..
Blah.
Friday, July 30, 2010
Mamiya RB67 ProS Repair Manual and Parts Catalog
A kind internet user has emailed me both the parts catalog and repair manual/sevice instructions for the Mamiya RB67 ProS, I previously scoured the internet for these but could not find either.
So I am making them available here for all film users, enjoy.
Service Instructions for Mamiya RB67 ProS
https://docs.google.com/fileview?id=12CM_sA3yELlU4ek6n7e5QCF7yAZjnOOo4zicWgWWc0ewuMDfm-9P8zGGmjPV&hl=en&authkey=CIH7t-0M
Parts Catalog for Mamiya RB67 ProS
https://docs.google.com/fileview?id=1zH6tCMpny0AnZvulZzEkjiy1eHmDWBve0K70pH7CFWjvoLpem_sYmOaRTDw0&hl=en&authkey=CLaQ9eoC
Tuesday, July 20, 2010
Shoulder Mount Follow Focus Idea
After seeing the excellent work done here - http://athan.se/diy-shoulder-rig/
I (obviously) thought that inexpensive plastic gears with a gear ring would make it a litle more 'proper' (or even lego gears), but the major problem was still the twist of the wrist while holding a shoulder mounted camera, which is not ideal.
No matter which way your hands are position with bars that are more horizontal, or vertical, the concept has the same problem (though its a very excellent solution for a mobile camera and pulling your own focus).
It suddenly hit me - a trigger.
You could use a trigger (like a gun), instead of any twisting motion.
The trigger pulls a spring when you press it in, which draws a line/cord/etc hooked up to pulley or other device, that converts that motion into rotating motion so you can run a gear, which then you gear up to the lens.
So as you press the trigger in, the focus moves closer (or further away), and as you let go, the spring pulls it back in the opposite direction.
So simple!
I'll have to find time to start building all this shit.
Wednesday, July 14, 2010
Satay
Peanut Oil + Chilli Powder + Ground Corriander + Ground Cumin + Brown Sugar + Peanut Butter + Milk = Delicious.
Monday, July 12, 2010
Graduated | Bleach Live Action
So I graduated.
What to do now?
I'm toying with the idea of doing a live action Bleach fan film in the trailer format, I want to show what a anime/manga to film translation should be like, as I heard there is a Hollywood manga to film adaptation of Bleach on the table.
Also because, the music is so great, and it can be really strong at times, I wish Bleach was pushed up to a Seinen rating from the beginning rather than Shonen, it'd have so much more potential.
Anyway, whatever I do, I'd be staying true to the character and style of Bleach and not raping it, though some differences rather than a complete literal translation are always needed to be true to the feel of the original material, as they are not in the same context across media.
I'd definately however, be targetting mine as 'seinen' though, in the anime adaptation of the manga, there is a deeper, darker and sinnister feel that kind of comes through but not quite, I want to bring this feeling right out, along with all the good points of Bleach.

Tuesday, June 29, 2010
DIY Light Meter Concept
So, just thought I'd make a new blog entry saying that I intend to build a light meter.
A CdS 'sensor' (light dependant resister or photo resistor) is pretty cheap, about $1, so I'm going to try and experiment and build a low-light meter.
Sekonic's seem to stop metering somewhere really lame, my Gossen Luna Pro SBC is several stops better, and goes down to EV -5, so I'd be looking at improving upon that essentially, a number of more stops.
Would be handy.
Sunday, June 13, 2010
16mm Motion Picture Film Developing Tank Mk1 aka "Missile Launcher"
Okay so the first developing tank is completed, it has numerous problems in operation, though isnt expensive to make, is a pain in the arse to actually use, I have already learned a lot and have a number of refinements for the heliacal-spiral type, though I'm 'putting my money' on a simple 2D spiral type.
Ultimately I want to construct something that has semi-automatic loading of up to 1000 ft in lengths in both 16mm and 35mm formats, which I have a few ideas for the future for.
Anyway, I've posted a video on vimeo detailing on putting this first version together, I will post chemistry mixing for ECN-2 and other videos in the future, such as other tank versions, and actually processing ECN-2 film, and B&W motion picture reversal stock.
http://vimeo.com/12522602
Video journal of the "missile launcher" (since it likes to launch the inner tube like a missile if you dont tape the end cap on when using it).
This shows construction of the first 16mm ~100ft I built (ended up being 86.5ft in this one).
There are problems with this design I didn't know about or think of until I went to use it.
This design takes a long time to construct, is very difficult to load.
I would also recommend if using the heliacal-spiral type like this desig of mine, to have the spiral track cut into a tube (perhaps a wooden solid cylinder?) about 0.5cm+ deep so the film can be crank-wound on.
Currently, at the moment I recommend a 2D spiral type on a base board that gets placed into a bath, a spiral may seem hard to make, but you can do it with vertical rods (nails, dowel, otherwise, etc) rather than two tracks at bottom and top like a 35mm/120 roll hand processing tank for still film.
If your film needs to touch against something (such as the rod 2D spiral type or rack processor, or this tank in the video) wind it on so the emulsion side is not touching anything, then it is perfectly fine.
I'll make a new tank and show a video, as well as mixing up useable formula for processing ECN-2 at some point.
I'll be scaling up my final design when I find the perfect design after building enough 100ft tanks for 400ft and 1000ft and 35mm as well.
Thursday, May 27, 2010
Adobe Premiere Pro 5 Desktop GPU Acceleration
GPU/CUDA acceleration can be enabled on nVidia cards that support CUDA and have at least 768MB of display memory apparently.
I did the follow hack with my GTX 260 (896MB) and it seems to accept it, I haven't done any serious testing or usage with it yet however.
How-To
(Source: http://www.cinema5d.com/viewtopic.php?f=29&t=14382)
[QUOTE=ZorkiKat;1002161]
A colour negative with punchy dyes will print with more punch on a positive material, when optically printed, that is.[/QUOTE]
Your results definately have a certain punch to them.
Step 1. Go to the Premiere CS5 installation folder.
Step 2. Find the file "GPUSniffer.exe" and run it in a command prompt (cmd.exe). You should see something like that:
-------------------------------------------------------------------------------- ---------------------------------------------------
Device: 00000000001D4208 has video RAM(MB): 896
Device: 00000000001D4208 has video RAM(MB): 896
Vendor string: NVIDIA Corporation
Renderer string: GeForce GTX 295/PCI/SSE2
Version string: 3.0.0
OpenGL version as determined by Extensionator...
OpenGL Version 2.0
Supports shaders!
Supports BGRA -> BGRA Shader
Supports VUYA Shader -> BGRA
Supports UYVY/YUYV ->BGRA Shader
Supports YUV 4:2:0 -> BGRA Shader
Testing for CUDA support...
Found 2 devices supporting CUDA.
CUDA Device # 0 properties -
CUDA device details:
Name: GeForce GTX 295 Compute capability: 1.3
Total Video Memory: 877MB
CUDA Device # 1 properties -
CUDA device details:
Name: GeForce GTX 295 Compute capability: 1.3
Total Video Memory: 877MB
CUDA Device # 0 not choosen because it did not match the named list of cards
Completed shader test!
Internal return value: 7
-------------------------------------------------------------------------------- -------------------------------------------------------
If you look at the last line it says the CUDA device is not chosen because it's not in the named list of card. That's fine. Let's add it.
Step 3. Find the file: "cuda_supported_cards.txt" and edit it and add your card (take the name from the line: CUDA device details: Name: GeForce GTX 295 Compute capability: 1.3
So in my case the name to add is: GeForce GTX 295
Step 4. Save that file and we're almost ready.
Step 5. Go to your Nvidia Drivercontrol panel (im using the latest 197.45) under "Manage 3D Settings", Click "Add" and browse to your Premiere CS5 install directory and select the executable file: "Adobe Premiere Pro.exe" (After adding mine said it was CS3 for some reason, no problem).
Step 6. In the field "multi-display/mixed-GPU acceleration" switch from "multiple display performance mode" to "compatibilty performance mode"
Step 7. That's it. Boot Premiere and go to your project setting / general and activate CUDA
Friday, May 21, 2010
Colour Developer Mk I Results
Here are some results from the first revision of my unnamed colour developer, which can be used at high dilutions, ambient temperatures, and long processing times like Rodinal.
1+100, 1 hour semi stand, 2 inversions at 30 min mark
These negatives came out with very rich negative contrast, but are very difficult to scan and correct, it turn out a bit flat in colour like this because of how dense they are.
This was on some unknown 400 speed film on sale at K-Mart "Shooter Fun SnapShots " on 35mm.

1+100, 30 min semi stand, several inversions at 15 min mark:
Top image is film, bottom is digital comparison for reference, right histogram is source histogram before adjustments on both images, left histogram is after black and white points had been set to the black and white squares on the colour chart.
Density range (dmax - dmin) is a bit small, I can see this recipe needs changing, I think I know exactly what the problem is too :)
This was also on "Shooter Fun SnapShots" on 35mm

I decided to do one more test, before redesigning the formula, with Kodak Ektacolor 160 (one of the Portra 160's I assume) on 6x7cm with the RB67.
It is 1+150, 1 hour semi stand, several inversions at 20 minute and 40 minute marks.
Results have a thin density range, developer needs a few things removed, and some other things added.
Example with source histogram:

Friday, May 7, 2010
Canon CanoScan 9000F Film Scanner
Attention Canon: Lies and re-iterated useless crap we film users are all god damn sick of makes me fucking angry.
So Canon have released a new film scanner.
http://www.usa.canon.com/consumer/controller?act=ModelInfoAct&fcategoryid=120&modelid=20411
It accomodates 35mm and 120, but not sheet sizes, unfortunately it is yet another fucking flatbed.
Apparently it's "been designed with film-faithful photographers in mind" - Jesus Tittyfucking Christ, you think these idiots would have learned by now we are god damn sick of their incompetent flatbed rubbish, no it has not been designed with film-faithful photographers in mind, it has been designed by marketing with dollar signs in mind, it is clear they are fucking incapable (read: unwilling) to improve 3 critical things in flatbeds since 2 decades ago:
1. Signal to Noise ratio, the sensors have nasty nasty noise, and typically scan at slightly different exposure times per line, which you can see when you need to stretch levels due to the scanner's shithouse dMax that's actually half of the advertised value.
2. DMax, has such poor DMax values, and the entire range isnt useable, the shadow and highlights section of the scanner are both so poor in quality, as to render an unusable image if your film falls on either end of it and not in the middle of the range.
3. True Resolution, these idiots want to up the sensor resolution, but they will not put in even $20 worth of optics to even be able to resolve anywhere near 50% of the claimed optical resolution.
Canon, Epson and others are LIARS and are committing FRAUD, they state a number like 4800 or 6400 dpi for optical resolution, when the optics they put in the scanners do not have that resolution, they are taking the sensor resolution and calling it optical resolution, that is plain fucking lying, it is also fraudulently misrepresenting the true performance of the scanner.
In the 9000F's case, it is 9600 dpi, fat chance they are putting in optics capable of resolving that sensor resolution, if Canon even put in optics that could resolve even a third of that (3200 dpi) I'd be over the moon and buy one to replace my piece of shit V500 for scanning 120 straight away soon as it was available.
Canon once made a great 4000 dpi scanner called the FS4000US, but what happened? It was discontinued with flatbeds as the replacement! Fuck me!
It's not impossible to make a flatbed form factor/design scanner with a high dMax, good SNR and with sharp optics, it is just not done for some reason, and I would love it if Canon have put that kind of equipment in their 9000F, it would make me happy to have available a good scanner on the market than can scan 120.
Currently, there is no such thing as a good 120 scanner available, they're all fucking shit, you have to find the ridiculously high priced 2nd hand dedicated scanners.
9600 dpi is just another fucking figure gimmick to complete with Epsons "6400" dpi, and probably to try and steal some market away from Plustek's 7200 dpi scanners given the indicated price point is just under the plusteks.
These scumbag marketing tactics while providing an inferior product are disgusting.
If you want a good 35mm scanner, the Plustek 7400 and 7600i are the choices available apart from 2nd hand dedicated scanners.
Even without the optics to support the resolution, if the 9000F had sheet film scanning, with a decent sensor (ACTUAL USEABLE capable dMax rating), with a good SNR, and non-varying exposure between each set of lines, then it'd be an awesome buy.
Saturday, May 1, 2010
Processing C-41 Colour Negative Film Yourself Cheaply in Australia
Update: After much digging and comparison, You can use the Fuji Starter for Kodak C-41 chemicals (warning: Kodak Flex SM doesn't use a starter, so dont add one if you use SM, and isn't replenished either), Fuji licensed it from Kodak at one point, and well, it's the same stuff.
Also it seems Vanbar has doubled it's price on Ferricyanide, I am experimentnig with a Copper Sulphate bleach (get it from the hardware store or possibly K-Mart/BigW/etc, Vanbar also sell it) and it works great, density is basically the same, very small colour difference if corrected the same as normal bleach, but you dont do that when scanning or printing colour in the dark room.
(Side Note: I plan on creating my own developer concentrate that can be used at 1+100 20 degrees celsius, similar to Rodinal, but a colour negative developer, which should also double as a developer for b&w film, and also substitute for the colour develop stage in E-6, I'll probably make it available $30 for 500ml )
Just thought I'd post a summary on the cost of getting into C-41 outside of the tetenal kits for more economy within Australia (although even Tetenal kits provide excellent value already), in case you think it's expensive, or hard, it is not.
If you can process B&W, you can process your own colour.
Kodak Flex SM Unit Dv 2 ltr (k36SM-DEV2) $18.64
(Flexicolor SM is recommended for tank processing, and doesnt require adding a starter, nor replenishment)
http://www.vanbar.com.au/catalogue/product.php?id=56350
or
Fuji CN16L C-41 Dev rep N1-CR 850067 (f3-CN16L-DR-20) (20 litre) $88.00
http://www.vanbar.com.au/catalogue/product.php?id=58648
and
Fuji CN16L C-41 Dev Start N1S 850066 (f3-CN16L-DS-10) $11.00
http://www.vanbar.com.au/catalogue/product.php?id=58649
Kodak Flex SM Final Rinse 1.5 ltr (k36SM-RINSE1.5) $6.27
http://www.vanbar.com.au/catalogue/product.php?id=56353
Agfa 70 BL (C41) 5 ltr (a341-5) $39.61
http://www.vanbar.com.au/catalogue/product.php?id=47886
OR
Photochem Potassium Ferricyanide per 1kg (05524-1000) $19.80
http://www.vanbar.com.au/catalogue/product.php?id=43258
and
Photochem Potassium Bromide per 1kg (05521-1000) $27.83
http://www.vanbar.com.au/catalogue/product.php?id=72170
(you can also just use non-iodised table salt instead of potassium bromide with no ill-effect for normal colour processing, it should also be slightly faster overall as it has a slight fixing action too - so i wont count the bromide in the cost - ps: dont mix fixer with ferricyanide) - 50g/L ferricyanide, 50g/L salt will work fine.
Kodak +E-6 Fixer & repl > 10lt (k397-10) $6.27
http://www.vanbar.com.au/catalogue/product.php?id=72253
There's also Kodak Flexicolor LORR (lower usage and replenishment rate - basically mixed developer lasts longer sitting around) developer replenisher for $46.75 (10 litre)
http://www.vanbar.com.au/catalogue/product.php?id=71807
But you need the starter for that, which I dont think Vanbar sells, but you could get away with using the slightly different Fuji starter listed above most likely if you want to do some testing before usage.
~$51 to get into C-41 processing with 2 litres of developer, with more than enough fix and bleach.
~$130 for the same thing with 20 litres of developer.
(or ~$79 for the 10 litre Flexicolor LORR)
Shipping Cost: Vanbar charges an $18 flat rate shipping Australia wide, and they do ship these chemicals.
Compared to the $150 5 litre Tetenal kit (I have used this and it does produce excellent results).
The above prices are for the Ferricyanide bleach you mix up yourself, not the Agfa C-41 premade bleach, I also didnt include the Potassium Bromide in the cost as you can just use salt from your cupboard at home.
I've also used the Agfa C-41 bleach and it works very well on both C-41 and E-6 film.
The chemical concentrates unmixed last a very long time, the E-6 colour dev I got from vanbar on special was expire in 2005, but they're still like new, I only mix up the developer as I need it, I don't use it one-shot either.
Thursday, April 29, 2010
Gold Coast Super 16mm HD Telecine Experience
Fuck me, this is going to be a rant, and a warning (hopefully) to others about using The Post Lounge (http://www.thepostlounge.com/) for telecine transfers (example at the end)
Just got out S16mm HD telecine back that we got done at The Post Lounge at the warner studio lot and I am angry.
Originally it was $450 for our HD telecine for the hour, uncompressed 10-bit onto a drive we supplied, and get it back same day.
Anyway, they notified us like 2 days before they were increasing the cost to $1000 iirc (and we ended up only in there for 20 minutes), which included postage (postage was like $250) to their Brisbane office so they could capture the tape.
They also notified us that they were scheduling us an hour earlier (hold - we're paying for it and booked our time - and now we're paying over double for it, for a worse end result, and we have to do it to their terms when they know how far we have to drive up to supervise?)
We didn't have have a choice to send it anywhere else after that, since it was already up there for processing and then delivered to the place for our arrival to supervise the telecine (nice and sharp on the raw telecine, soft as a soggy kleenex once we got the footage back). We were also asked "where's your film?", they had to go chase it up after we reminded them that it was delivered to them directly from the lab (which is the usual case), that's not really even an annoyance or concern for me though.
Anyway after the telecine operator went through it, he put it out to tape, which ended up being HDCAM, not HDCAM SR, but HDCAM 3:1:1 8-bit 1440x1080
Which sucks, what I'd like to point out at this point, is when we got the footage back, I noticed that the gamma and white points the operator had set, suit when the camera is spinning up or spinning down (which exposes the negative more and hence increases overall density) and not when the camera was at speed (in our case, 25 fps), so the white point has been set for the brightest highlights 2+ stops above our useful footage.
A fucking monkey pressing an auto-levels button could do that, why the fuck would you pick the sections where you turn on and off the camera (which have the greatest highlight density) to set the white point to?!
Now if we were getting the uncompressed footage, this wouldn't be a problem, may even be not so bad with HDCAM SR, but that simple fact means we have vastly less information/bit distribution etc for our useful footage, he may as well have just run an auto-levels over the entire lot of the footage in one go and set black to minimum neg density, and white to maximum neg density.
Oh, and the footage went through a second stage of lossy compression during capturing at the Brisbane location, which just makes it worse.
What it means, is twice the cost, for an inferior service and end product (soft, noisy, simple grading after levels correction causes banding), and a wait of a week, instead of same day.
So, apparently, they no longer have the facilities to do a transfer at their Gold Coast presence (and the packaging they put the drive in must be made out of gold foil to justify the $250 postage price for the drive).
So I would just like to put that out there in case there happens to be even one of you out there on a production considering getting a telecine done on the Gold Coast - I'd say to you, consider if that suits your needs, and if it does, I'd say it'd be cheaper and less time consuming to shoot on HDV. If it doesn't - look elsewhere, courier to Sydney etc (will cost a lot less too).
Verdict: Shameful service, just because we're only getting 400 ft of film done doesn't mean they can neglect our service, put a lovely tax on us (over twice the cost in total including $250 for postage over a distance of 100km?!), do a fucking shameful job, and after charging us over double compress out footage down using a codec with a shitty bit-depth and nasty chroma-subsampling with an anamorphic aspect ratio (throwing out resolution) that is 13 years old to tape only to be captured and lossy compressed again.
Do you even give a fuck about your business, or the job you do and quality of service you provide?
Here is one example of a typical well-exposed scene at EI50 (Even if it was underexposed, which it wasn't, a normal telecine operator would sit correct it and set the white point, gamma and black points), and the version after that I simply set black and white points on, not even touching gamma, gosh that was such hard work!
Simply click on the examples for the full-resolution ("1920" x 1080) image.


Wednesday, April 21, 2010
Super 16mm Telecine
So will be on my way to movie world, Gold Coast later today for the telecine transfer of some Kodak 50D I shot for a uni project.
Will put up some results when I get the drive back.
Will put up some results when I get the drive back.
Tuesday, April 20, 2010
Colour Photographic Formulae and Processing Times
I didn't write the following documents, these documents were collated and created and sent to me by APUG user mts, but I will try to update them and add notes when I experiment with any of them, I hope they serve someone well when this kind of information is hard to come by and seems to be disappearing, I hope to preserve and grow this information for the benefit of all film users world wide.
If you have any questions or queries, leave a comment, or join APUG.
Formula:
http://docs.google.com/View?id=dhb94mck_38crprhxcf
Processing:
http://docs.google.com/View?id=dhb94mck_32vc6d7h68
If you have any questions or queries, leave a comment, or join APUG.
Formula:
http://docs.google.com/View?id=dhb94mck_38crprhxcf
Processing:
http://docs.google.com/View?id=dhb94mck_32vc6d7h68
Subscribe to:
Posts (Atom)